
It’s the middle of a dinner rush, and your fryer suddenly goes cold. The first instinct is usually to grab the phone and call a technician. But what if you could diagnose and fix the problem yourself in just a few minutes? This guide is your new go-to, showing you how to calmly and safely tackle common equipment failures before making that expensive service call.
Your First Line of Defense in Kitchen Repairs

In a busy kitchen, the constant hum of refrigerators and the roar of ovens are the sounds of money being made. When one of those essential pieces of equipment goes silent, it can send a wave of panic through the entire staff. An oven that won’t heat or a walk-in that’s losing its chill isn’t just an inconvenience it’s a direct threat to your inventory, your profits, and your reputation.
While the immediate urge is to call for professional help, you’d be surprised how many equipment failures come from simple, fixable issues. Giving your team the knowledge to handle basic troubleshooting can turn them from helpless bystanders into an efficient first-response team. It’s more than just a quick fix; it’s about taking control of your kitchen’s operational health.
Building In-House Troubleshooting Skills
You don’t need to turn your line cooks into certified mechanics. It’s about empowering your staff with the confidence to run through a few basic checks before panicking. This shift in mindset from reactive to proactive is a game-changer.
Think about the immediate benefits:
- Slash Downtime: Fixing a tripped breaker or a clogged filter yourself takes minutes. Waiting for a technician can take hours, sometimes even days.
- Save Money: You get to skip the hefty emergency service fee for a problem that was a simple fix all along.
- Extend Equipment Life: Catching and addressing small issues prevents them from snowballing into catastrophic (and expensive) breakdowns. A solid preventative strategy, like the one outlined in our guide to commercial kitchen equipment maintenance, is key.
This proactive approach is essential in a high-wear environment. Kitchen equipment is pushed to its limits daily. In fact, market analysis reveals that nearly 68% of commercial kitchen equipment demand comes from restaurants just replacing old, worn-out units. That tells you everything you need to know about the stress these machines are under.
When your equipment inevitably acts up, a quick diagnostic check can save you a world of hurt. Before you even think about calling a technician, have your team run through these basics.
Quick Diagnostic Checklist for Kitchen Equipment
This simple table can be a lifesaver. Post it in the kitchen or include it in your training manual so your staff knows exactly what to check first when a common appliance goes down.
| Appliance | Common Symptom | First Diagnostic Step | Potential Simple Fix |
|---|---|---|---|
| Refrigerator/Freezer | Not cooling | Check the power connection | Plug it back in; reset the circuit breaker |
| Walk-In Cooler | Temperature is rising | Listen for the compressor fan | Clear debris from around the condenser unit |
| Ice Machine | Not making ice | Check the water supply line | Ensure the water valve is fully open |
| Oven/Range | Won’t heat up | Verify the pilot light is lit | Safely relight the pilot light |
| Fryer | No power/heat | Check the main gas valve | Ensure the gas valve is in the “on” position |
Running through this checklist first will help you solve the easy problems on the spot and provide better information to a technician if you do end up needing to make that call.
The goal isn’t to replace your trusted repair tech. It’s to make sure you only call them when you really need them. By mastering these first few checks, you filter out the noise and save the professional help for the genuinely complex issues.
This guide will walk you through the practical, hands-on steps to become that first line of defense. We’ll skip the jargon and focus on what actually happens in a real kitchen, so you can diagnose problems with confidence.
Solving Commercial Refrigeration Breakdowns
When a refrigeration unit starts to fail, the clock is ticking on your inventory. A prep fridge running warm or a walk-in cooler struggling to hold temp isn’t just an inconvenience—it’s a full-blown crisis that threatens food safety and hammers your bottom line. Getting these issues sorted out fast is a huge part of any smart plan to repair restaurant equipment.
One of the first places I always look is also the most frequently ignored: the condenser coils. Think of these as the unit’s lungs; they’re responsible for pushing heat out. When they get caked in the usual kitchen grime—dust, grease, and everything else floating in the air—the compressor has to work itself to death, burning more energy until it eventually gives up. Keeping them clean is a simple task that can head off a massive number of service calls.
Diagnosing Common Cooling Failures
Before you panic and assume the compressor is shot, a quick, methodical check can often reveal a much simpler fix. Fluctuating temperatures don’t always mean a catastrophic failure. Sometimes, it’s as simple as a bad door gasket.
Go ahead and run your hand along the seal of the closed door. Feel any cold air seeping out? If you do, that gasket isn’t creating a tight seal anymore. This tiny gap forces the unit to run constantly just to keep up, sending your energy bills through the roof. Swapping out a worn gasket is an easy, inexpensive repair that pays for itself almost immediately.
Another common gremlin is a thermostat that’s out of whack. If you stick a reliable thermometer inside and it’s showing a different temperature than the unit’s display, the thermostat likely needs to be recalibrated. This is all about making sure your equipment is working smarter, not harder.
Your refrigeration system’s health is directly tied to its ability to breathe. Dirty coils and poor airflow are the root causes of many expensive breakdowns, turning what should be a routine cleaning task into a costly emergency repair.
Let’s play out a real-world scenario. Your prep fridge just isn’t feeling cold enough. First thing’s first: look for the obvious. Are stacked-up food containers or boxes blocking the interior vents? This happens all the time in a slammed kitchen. If the vents are clear, listen for the evaporator fan inside. If it’s dead quiet, you could be looking at a failed fan motor that’s preventing cold air from moving around.
The image below gives a great visual breakdown for staying on top of these critical maintenance checks.
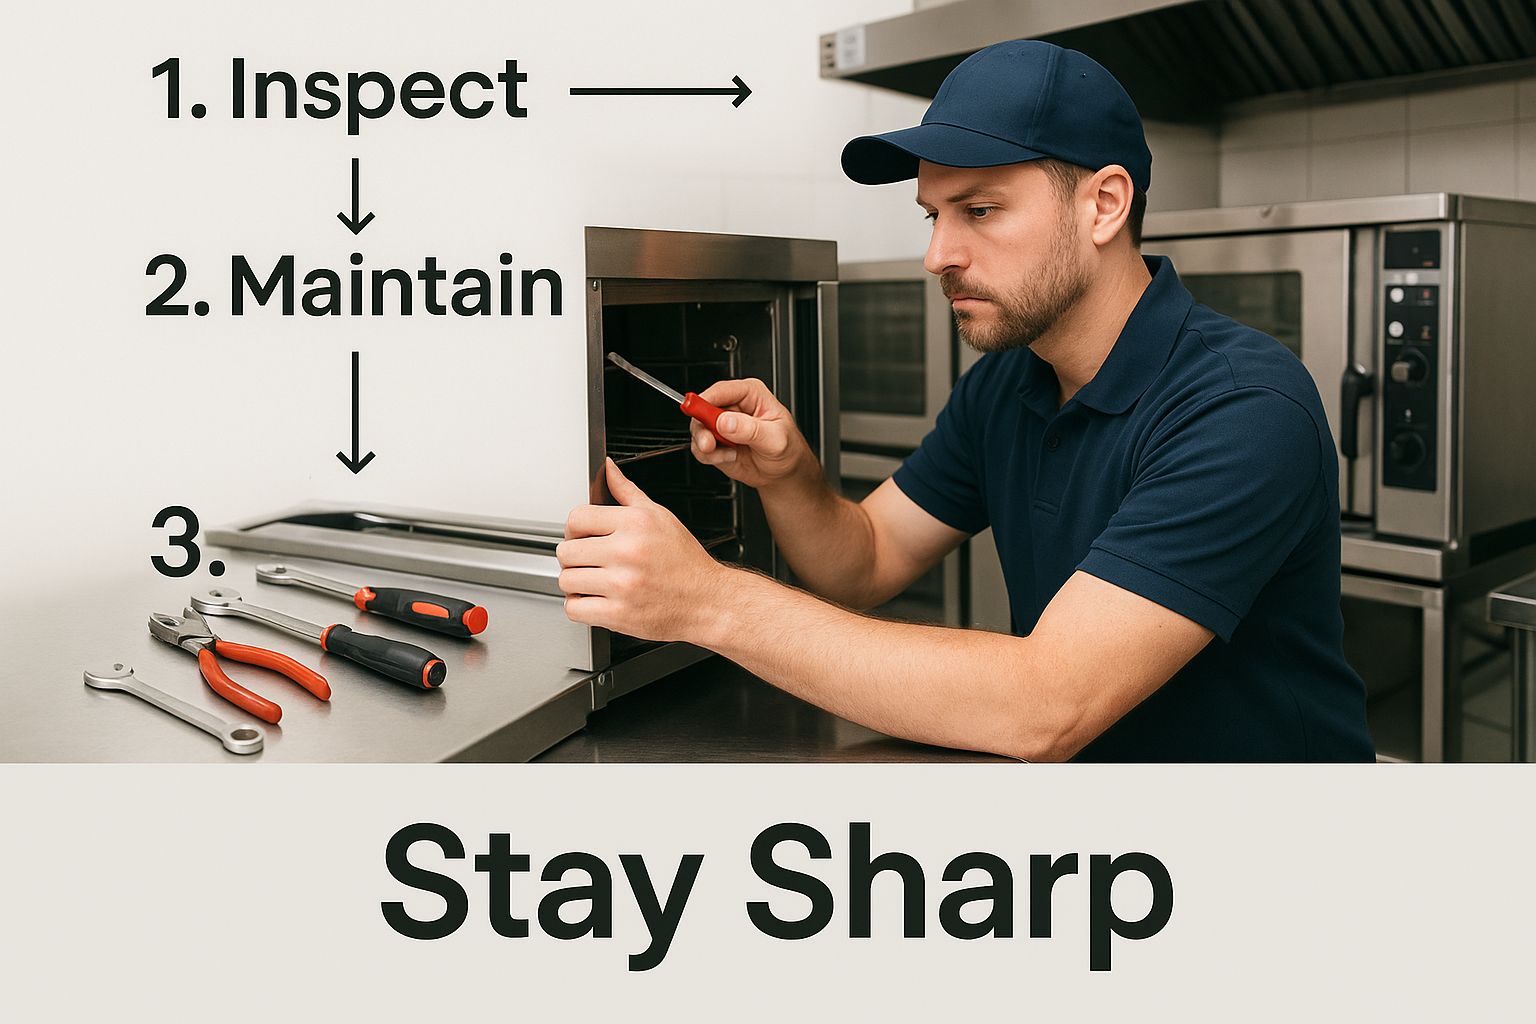
As you can see, having a structured, proactive mindset is probably the most valuable tool you can have.
Cleaning Condenser Coils Safely
Getting those condenser coils clean is one of the most impactful DIY jobs you can do. But first, safety. Always unplug the unit from the wall before you do anything else. This is non-negotiable.
Once it’s powered down, find the coils. They’re usually on the bottom or back of the unit, behind a panel.
- Grab a stiff-bristled brush.
- Gently scrub away all the built-up dust and gunk.
- Important: Brush with the grain of the coil fins, not against them, to avoid bending the delicate metal.
After you’ve loosened everything up, use a shop vac to suck all that debris out of there. For a deeper dive, you can learn more about these 5 common commercial refrigerator problems and figure out when it’s time to call in a pro.
One last thing to check is the evaporator coil inside the unit. If you see a heavy layer of frost built up, that could signal a problem with the defrost system a more complicated issue that usually requires a technician. But by just keeping the condenser coils clean and checking your gaskets, you’ll be able to solve the vast majority of cooling headaches yourself.
Fixing Commercial Ovens and Ranges

Your ovens and ranges are the absolute workhorses of your kitchen. When one of them goes down mid-service, the entire line can grind to a halt. We’ve all been there, a pilot light that refuses to stay lit or a convection oven with frustrating hot spots. These problems can paralyze a kitchen, so learning how to handle them yourself is a vital skill if you want to repair restaurant equipment and get back on track fast.
The good news is that many of these show-stopping issues have surprisingly simple fixes. It’s all about knowing where to look and what to check, whether you’re working with gas or electric gear. A little knowledge here can save you a ton of time and prevent a minor snag from blowing up into a major expense.
Troubleshooting Gas Ovens and Ranges
When a gas range acts up, the most common culprit is also the easiest to check: the pilot light. Before you start tearing anything apart, make sure it’s actually lit. If you find that it keeps going out, your attention should turn to the thermocouple. This little safety sensor can get dirty or simply fail. Sometimes, just a gentle wipe of its tip with a soft, dry cloth is all it takes to get it working again.
Another frequent headache is a weak or uneven flame coming from the burners. More often than not, this is just a simple case of clogged burner ports from spilled food and grease buildup.
Here’s the fix:
- First, make sure the unit is completely cool and the gas is shut off before removing the burner head.
- Next, grab a paperclip or a small, stiff-bristled brush. Carefully clean out any gunk from each individual port on the burner.
- Whatever you do, don’t use a wooden toothpick. They can easily snap off inside the port, leaving you with an even bigger mess to deal with.
Keeping those burners clean is a quick maintenance task that pays off big time in consistent cooking performance.
Tackling Electric Oven and Fryer Issues
Electric ovens bring their own unique set of problems. If your electric oven isn’t heating up at all, the issue is almost always the heating elements or the thermostat. Give the elements a quick visual check—if you see any breaks, burn marks, or blisters, you’ve found your problem. They’ll need to be replaced. If they look fine, the next step is to test their continuity with a multimeter to be sure.
Ever had a convection oven where the fan is blowing, but there’s no heat? It’s a classic kitchen mystery. In these cases, the problem is usually a faulty high-limit switch or a bad thermostat. These parts are designed to prevent overheating, but they can and do fail over time.
This same thought process applies to other electric cooking equipment. If your fryer is on the fritz, for instance, a resource like an Atosa Fryer Parts Guide can be a lifesaver for quickly identifying the exact thermostat or high-limit switch you need to order.
It’s these kinds of self-repair capabilities and smarter components that are driving serious growth in the restaurant equipment market. The industry, valued at USD 4.8 billion in 2025, is on track to more than double to USD 10.2 billion by 2035. This boom is largely fueled by the demand for smarter, more reliable, and more automated appliances in modern kitchens. Keeping your equipment in top shape isn’t just about avoiding a bad service—it’s about staying competitive.
Tackling a Malfunctioning Ice Machine
There’s nothing quite like the sound of an empty ice scoop scraping the bottom of the bin during a dinner rush. It’s a moment of pure panic. When your ice machine goes down, it can throw a wrench in your entire service, which is why knowing how to do a quick diagnosis is one of the most valuable skills in any kitchen.
Believe it or not, most of the common failures—the machine producing no ice, making too little, or dropping weird-looking cubes—boil down to a handful of simple issues. Before you pick up the phone for an expensive emergency call, a quick, systematic check can often solve the problem. I’ve found that more often than not, it’s a maintenance issue, not a major mechanical failure.
What to Do When Ice Production Stops
Let’s run through a classic scenario I see all the time: the machine is on, you can hear it running, but the bin is empty. This is probably the most common complaint out there.
Your first stop should always be the water supply. Is the valve on the water line turned on all the way? It sounds obvious, but you’d be surprised. Next, check the water filter. If that thing is clogged, you’re starving the machine of the one ingredient it needs. A weak water flow is a top reason for low or zero ice production.
After water, think about air. Your ice machine’s condenser is like its lungs—it needs to breathe to get rid of heat.
- Look for Blockages: Are there boxes, buckets, or cleaning supplies crammed around the machine? Clear the area to give the vents at least six inches of space.
- Clean the Condenser Coils: These coils are magnets for kitchen grease and dust. A quick cleaning every month with a stiff brush will make a world of difference in its performance.
- Check the Air Filter: Most commercial machines have an air filter that you can pop out and clean. Check your manual, but a simple rinse and dry is usually all it takes.
These three simple checks prevent the machine from working itself to death just trying to cool down.
The Real Culprit: Scale Buildup and Dirty Sensors
If I had to name the number one killer of commercial ice machines, it would be mineral buildup, or scale. This is a massive problem, especially if your restaurant is in an area with hard water. Scale silently coats every surface inside your machine, choking off water lines, gumming up pumps, and insulating the evaporator plate where the ice actually forms.
I can almost always tell a machine is caked with scale just by looking at the ice. If you’re getting thin, cloudy, or hollow cubes, that’s a dead giveaway. The mineral deposits are preventing the water from freezing properly, leading to garbage ice and, eventually, a total shutdown.
This is exactly why a routine cleaning and descaling cycle is not optional. Sticking to a schedule doesn’t just give you clear, sanitary ice; it’s the single best thing you can do to prevent costly service calls.
Modern machines also depend on a variety of sensors to run the harvest cycle. When scale covers these sensors, they can’t get an accurate reading. This can cause the machine to get stuck in an endless freeze cycle or prevent it from dropping the ice it just made. Keeping those internal components clean is absolutely critical to keeping your machine running reliably for years.
Knowing When to Call a Technician
Smart repairs aren’t just about what you can fix, but also knowing what you shouldn’t. Being able to handle minor issues yourself is a huge money-saver, no doubt. But some problems come with risks that just aren’t worth the potential savings of a DIY fix. Honestly, the most important part of any plan to repair restaurant equipment is knowing your limits.
The decision to pick up the phone and call a pro usually boils down to three things: complexity, safety, and specialized tools. If you’re looking at a repair that involves tangled wiring, gas lines, or sealed refrigeration systems, it’s time to take a step back. The potential for a costly mistake—or worse, creating a dangerous situation for your staff—is just too high.
Red Flags That Demand an Expert
Some symptoms are clear signs that you’re in over your head. These aren’t just suggestions; these are the moments when you absolutely must call a certified technician. Don’t even hesitate.
- The Smell of Gas: If you get that distinct rotten egg smell near a gas appliance, shut off the main gas supply to that unit immediately. Your next call should be to a professional.
- Burning Plastic or Electrical Smells: This is a huge warning sign. It often points to overheating wires or a motor that’s about to give out, which is a serious fire hazard.
- Oily Residue Near Refrigeration Units: See an oily film on the floor or on the lines? That’s a classic sign of a refrigerant leak. Not only is this bad for the environment, but it can only be fixed by a licensed pro.
- Loud, Unusual Noises: Any sudden grinding, clanking, or high-pitched squealing from a motor or compressor is a sign of major mechanical failure on the horizon. It needs an expert diagnosis, fast.
Trying to tackle these problems yourself can easily turn a straightforward repair into a full-blown equipment replacement or a safety nightmare. Your team’s well-being and the safety of your kitchen always come first.
Swapping a blown fuse is one thing. Dealing with a failing compressor that requires evacuating and recharging refrigerant? That’s a job for a pro with specific certifications. Knowing the difference is what separates a savvy operator from a reckless one.
Balancing DIY with Professional Support
The best way to keep those emergency calls to a minimum is to build a culture of proactive maintenance. Regular upkeep doesn’t just make your equipment last longer; it helps you catch small problems before they become big, expensive ones. We cover some great starting points in our article on 5 essential maintenance tips for commercial kitchen appliances.
At the end of the day, a solid maintenance program is all about prevention. In fact, studies show that a good preventive maintenance schedule can slash unexpected equipment failures by over 30%. That means fewer disruptions and lower repair bills.
This investment in routine upkeep doesn’t just extend the life of your gear; it also helps you stay compliant with food safety laws. By confidently handling the simple fixes and knowing exactly when to call for backup, you’re protecting your staff, your equipment, and your bottom line from costly mistakes.
Got Questions About Equipment Repair? We’ve Got Answers.
Even the most seasoned kitchen managers run into questions. Getting a handle on the bigger picture of repairing restaurant equipment isn’t just about fixing what’s broken; it’s about building a smarter maintenance routine that prevents problems in the first place. Let’s tackle some of the most common questions I hear from managers in the field.
How Often Should We Really Be Doing Preventive Maintenance?
I get this one all the time, and the honest answer is: it depends. There’s no one-size-fits-all schedule. The right frequency comes down to the specific piece of equipment and how much you use it. For instance, your deep fryer’s oil quality is a daily check, no question. But the condenser coils on your walk-in might only need a thorough cleaning every three months.
Your starting point should always be the manufacturer’s manual—think of it as your baseline. Then, you need to adapt that schedule to the reality of your kitchen’s workload. A busy pizzeria is going to need to clean and inspect its oven decks way more often than a small coffee shop.
What’s the Real Number One Cause of Equipment Failure?
Most breakdowns aren’t caused by some sudden, catastrophic event. More often than not, the culprit is something much quieter: a slow, steady buildup of neglect. Simple, consistent upkeep is your best defense.
From what I’ve seen over the years, the issues are almost always the same:
- Grease Buildup: This is a huge one. Grease clogs burner ports and coats moving parts, making them overheat and fail prematurely.
- Dirty Filters: When you starve equipment of clean air or water, you force the entire system to work overtime just to keep up.
- Loose Connections: The constant vibration in a commercial kitchen can easily work electrical connections loose over time, causing frustrating, intermittent power issues.
It really goes to show that a few minutes of proactive cleaning can save you from a major headache and a costly service call down the line.
Should I Spring for OEM Parts or Go with a Cheaper Generic?
The lower price of aftermarket parts can be tempting, I get it. But it’s a gamble. For one, using a generic part can void your warranty in a heartbeat. More importantly, they often don’t have the same precise fit or quality as Original Equipment Manufacturer (OEM) parts. You might save a few bucks now, but you could be setting yourself up for a bigger, more expensive failure later.
My rule of thumb is this: for any critical component that affects temperature, safety, or the core function of the machine—like a thermostat, gas valve, motor, or control board—always spend the extra money on OEM. The reliability and perfect fit are worth every penny for your peace of mind and the long-term health of your equipment.
When Is It Time to Repair vs. Just Replace Old Equipment?
This is the big question. It can be a tough call, but a simple guideline I always recommend is the 50% rule. If a repair quote comes in at more than half the cost of a new, comparable unit, it’s almost always smarter to replace it.
Don’t forget to look at the hidden costs, too. A new, modern appliance is often far more energy-efficient, which translates to real savings on your utility bills month after month. And take a hard look at the unit’s track record. If you’ve had to call a technician out multiple times in the last year, it’s probably time to let it go. Investing in a new, reliable machine will save you a lot more in the long run by cutting out those repeat repair bills and an-noying downtime.
When a repair is too big or too dangerous to handle yourself, you need a team you can count on. Ice Age Refrigeration offers expert commercial appliance repair services across the Phoenix Metro Area to get your kitchen firing on all cylinders again. Contact us today for reliable service.